REVIEW: Silva Expedition Compass

Ok, before you all cry that the Expedition 4 compass has been on the de facto standard compass for every Brit venturing into the outdoors for decades why are you writing a review. Stop. This isn’t a review of the Silva Expedition 4 compass. This is the newer Silva Expedition Compass. Bonus points to Silva for their highly non confusing naming scheme…

Compass on Map

I wanted to get myself a new compass after being fed up with my old cheapy one. I asked around for recommendations and found that pretty much everyone recommends the Expedition 4. Then a Danish friend let me have a play with his Expedition, I preferred it to the Expedition 4. Which is when I discovered an issue. The Expedition 4 is only available in the UK (anyone know why?), and consequently the Expedition is not available in the UK (anyone know why?). Fortunately I found myself in Germany just before Christmas and managed to pick one up. It cost me €42.

Seeing as the Expedition is almost unheard of (and very hard to buy) in the UK, I thought I’d write a brief review.

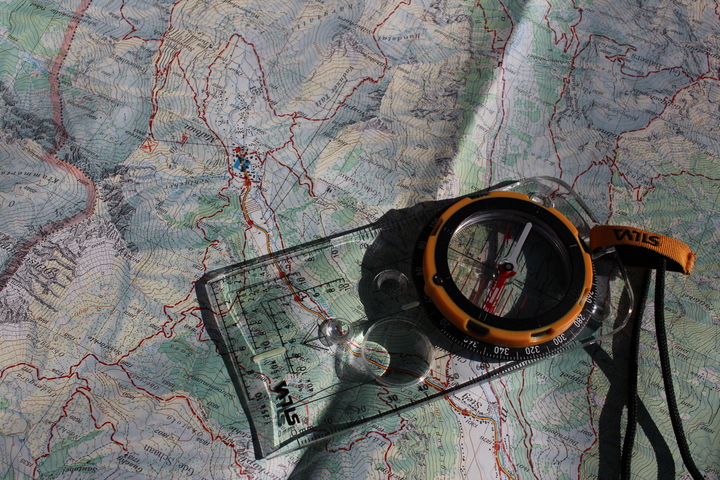
So what’s the difference between the Expedition 4 and the Expedition? The first thing that stands out is the bezel. This is a bright orange and black affair that is really easy to use with gloves on and without. Compared to the Expedition 4, I prefer it.

Close up of compass

Next up, as you study the inside of the compass you notice there is what looks like another needle in there, the inclinometer. What’s one of those? Well it’s for measuring the angle of incline. Why do you need that? In the UK, that’s a mighty fine question. Generally as you’re standing in the middle of kinder on a summers day you don’t really need to know the incline of the nearest tussock. The manual suggests that the inclinometer is there to measure the angle of slopes for assessing avalanche risks. I’m not experienced in avalanche awareness, so haven’t used this feature this way. But as an Arboriculture student, I’ve found it’s really useful for measuring the height of trees. Hopefully as I venture into the mountains in winter (under the instruction of a guide at first), I will get to use this feature for what it was intended. In the mean time, do you want to know how tall this tree is?

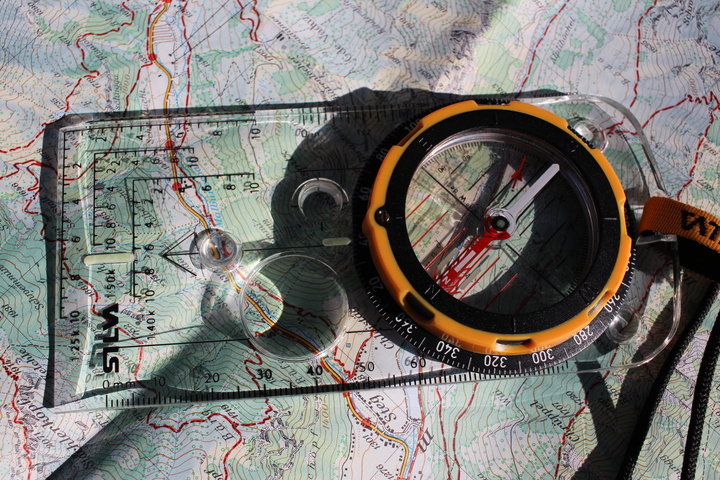
If you look really closely at the bezel you will notice a small brass screw. If you pull the safety lanyard firmly, you’ll find it splits. Inside one of the ends is a screw driver. Turn the brass screw, and you’ll notice the inside of the compass turns. This is so you can adjust magnetic declination for the area you are in. When I first got home, I got out my local map to adjust it, found that my local area is 2° of declination, and didn’t bother. Turns out for every map I own, the declination is next to nothing, so this feature hasn’t been as useful as I had hoped… If I ever get to head up to the north of Sweden to Sarek and the like, then I can use this to adjust the 6°. Or if I get to New Zealand, where the declination can be in excess of 20°.

Beyond this, the compass has the usual romer scales you would hope for – 1:40k 1:25k and 1:50k, As well as mm and inch scales. There is a magnifier for those wanting to do really close in map work, and the usual hole for marking the map. All of which you also find on the Expedition 4.

As you can see this is a compass for those wanting that little bit more. If you are out in avalanche country or plan to visit areas where magnetic declination is a bit more than your usual margin of error, then this compass is a big improvement over the Expedition 4, well worth the effort to either import it (a couple of German shops will ship them to the UK, including via Amazon), or picking one up when abroad. If however you generally hike only in the UK, you’re probably OK with the older Expedition 4. If you’re not in the UK, well you can’t get the expedition 4 anyway, and this is a great compass, even if you might not use all the features on offer.

For those of you who prefer to use mirror compasses, there is a mirror version of the Expedition.

KIT: The big three

This post is another in response to a question I’ve had: (Slightly Paraphrased)

“Do you really fit a weekends worth of wild camping gear in 5kg?”

The answer is Yes, I do. But before I go into details of what makes up the bulk of the 5kg, I should qualify things. Firstly, that 5kg is dry weight, so that doesn’t include water, food, or fuel. Secondly, that is the summer bag. In winter I use a heavier sleeping bag and a heavier bivvi bag, making my dry pack weight nearer 6.5kg.

The big three is a term coined by Ray Jardine. They make up the bulk of the weight of your pack. So what are they?

  • Backpack
  • Sleep system
  • Shelter

In non ultra light hiking it’s easy to pile on the pounds with these three items. Before I started aggressively lightening my pack the big three were:

  • Backpack – Berghaus Vulcan + PLCE Side pockets – 3.2kg 110L
  • Sleep system – Snugpak SF 2 sleeping bag + Highlander self inflating sleep matt – 3kg
  • Shelter – Vaude Hogan – 2.9kg

You can see that these three items alone are over 9kg. Having 110L of backpack then encourages you to take more stuff, after all you’ve got the space in your pack… This resulted in my lugging 25-30kg backpacks round Europe on various trips before I decided that there had to be an easier way of doing it.

So what are my current big three?

  • Backpack – Osprey Tempest 30 – 0.85kg
  • Sleep System – Mountain Equipment Lamina 35 sleeping bag (1.02kg), Exped Synmat 7UL (439g) – 1.459kg
  • Shelter – AMK SOL Escape Bivvi (240g), Miltec Flecktarn plane tarp(543g inc pegs + guys) – 0.783kg

Those of you good at mental arithmetic will be able to quickly sum that the total for the big three is 3.092kg. Giving me around 2kg for all the other bits an pieces.

I mentioned before that this is my summer bag. What changes in winter?

  • Sleep system – Mountain Hardware Laminina 20 – 1.55kg
  • Shelter – British Army XL Goretex bivvi bag ~0.9kg

This adds 1.3kg on to the weight of the summer bag. The only reason I change bivvi bag is because the AMK SOL Escape bivvi bag is a bit tight on the hips, causing compression of the loft, resulting in cold spots. I am thinking of getting an Alpkit Hunka XL for next winter, saving me about 400g.

So you can see, a simple yet light big three, with the best part being that the most expensive single item was the sleeping bag (£93 for the Laminina 20, and £85 for the Lamina 35). Going ultra light doesn’t need to be that expensive.

KIT: Taking shelter – Tarps.

I’ve had a question asking me what tarp I use when I’m wild camping with a bivvi bag.

I own three tarps. Which one I take with me for any given trip depends on where I am going.

The first tarp I got is a British Army Basha. It’s 2.5m x 2.2m, made from Silnylon, and weighs in at nearly 1kg with guy lines. It’s a lovely tarp that covers a nice big area, but it is very heavy. If I am car camping and don’t want a tent, then this is the tarp I use.

British Army Basha in the woods – June ’14.

The second tarp I got is a Miltec Flecktarn Plane Tarp. This tarp is 2.6m x 1.7m, weighs in at 450g, and is made from PU coated nylon. This is the tarp I take when wild camping in lowland situations where perhaps wild camping isn’t entirely encouraged. The flecktarn camo pattern blends well with many of the areas I camp in, particularly in winter. This tarp isn’t as big as the Army Basha, but it’s half the weight, and provides enough cover for me in a bivvi bag.

Miltec Flecktarn tarp in the woods – May ’15

The 3rd tarp I own is a RAB Siltarp 1, this tarp is 2.2m x 1.5m, weighs in a 198g without stuff sack, and is made of Silnylon. It’s a beautiful light tarp that I got to use with a bivvi bag when wild camping in locations where stealth isn’t my primary concern. In some respects the lightness of this tarp has given me headaches with other aspects of the tarp setup. Add eight 12g pegs, and you’ve increased the weight by 50%… I use 1.12mm microparacord for the guys on this tarp, it’s under half the weight of the 2mm dyneema I normally use for my other tarps. The total weight of the guys on this tarp is 28.6g. I’m still searching for the best pegs.

If you ask on a bushcraft forum for a tarp recommendation, the DD 3m x 3m tarp will come highly recommended. I decided against it as being too heavy, and also too big. Camping in woodlands, finding space for 9m² of tarp is not always easy. If I was in the market for a new tarp to use when bivving aside from the tarps I own, the other that I would consider near the top of the list is the Alpkit Rig 3.5.

On all my tarps I use glow in the dark line loks on the guy lines. They provide just enough visibility at night to see where I put my guys. I currently have some spares up on ebay if anyone is interested.

Hopefully this post has gone somewhere to answer the question about which tarps I use, and what tarps I would recommend.

REVIEW: Osprey Tempest 30 Backpack

I recently switched to the Osprey Tempest 30 backpack from my old Deuter Futura 32AC. This is the ladies version of the Talon 33. For the most part everything I say here will apply to the Talon as well as the tempest.

Me wearing the pack

I’ve been using this pack as my every day handbag for the whole summer now, including a few over nighters, and an ascent of Pen-Y-Fan. So I think I’m getting used to it. Despite what is pretty light usage, there are some signs of wear appearing.

The right hand waist pocket has a couple of holes poking through it. I don’t know if this is something inside that’s poked out, or something outside that’s poked in.

Hole in pocket

I tend to store my keys in that pocket, so both are possible answers.

On the side pockets the mesh has also taken a couple of nicks, nothing serious, but it isn’t perhaps as durable as the packs I have been used to:

Pocket holes

Beyond these two niggles, there are no other obvious signs of wear.

What about usability? Due to the lightweight back system having very little rigidity, if you sit the pack on the ground, with a loaded lid pocket, but an empty main pocket, then it crumples. This makes packing slightly more awkward than I would like but it’s to be expected from such a light pack. The draw cord for closing the top is not your standard toggle, but a slightly awkward to use system. The main issue being that you have to use two hands to open and close the pack, unlike your normal toggle that you can usually use one hand to open and one hand plus teeth to shut. This is an awkward niggle, it’s not a show stopper, but it does niggle if you have to go into the bag a lot. It’s worth noting that the Airscape back system does not keep your back dry on warm days. I’ve yet to find a back system that doesn’t leave you with a big sweaty back, so this is hardly a black mark on the Tempest, but something to be aware of.

There is no lower lash point on the bag for things like a sleep matt. I retrofitted a bungee on the back of the pack using the loops reserved for walking poles. It’s not ideal, being set on the back of the pack, it moves the centre of gravity back somewhat, which can effect balance. But it’s better than nothing.

Bungee mod

And Comfort?

Comfort is a bit of a mixed bag. On the one hand with 16kg of load, the pack was very comfortable, transferring the weight onto my hips effectively, Better than many heavier packs with more substantial frames. *BUT*, and it’s a big But, there is one part of the pack that lets it all down. The pack is the ladies version, aimed at women. Women come in many shapes and sizes, myself, carry round with me a little bit more Kummerspeck than I would like, and my chest is sufficient to distract many men. The combination of this means that where the straps on a pack lay on the female form is not the same as it would be on a male form. This, along with back length, is one of the important reasons for choosing a ladies pack over a mens. So you would think then that a ladies pack would sit comfortably across the chest.

Pack shot 2

Well you’d think that. The reality is, while the padded section of the strap sits nicely and comfortably. It’s great. *BUT*. at the bottom of the padded section, there is a ladderloc that connects to the webbing that goes to the base of the pack. It’s this ladderloc that is the problem. For anatomical reasons, this ladderloc on the female form arrives right on the side of the body, where the upper arm rubs against the body when you walk. This becomes more and more uncomfortable as the hike progresses, to the point of large red uncomfortable marks on the arm by the end of the day. I’m sure that on a more thinner woman it might be less of a problem, but considering that this pack is aimed at women, you would think they would have tested this on a few different shapes and sizes… Modifying the pack to fix this problem isn’t a major mod, it’s one I’ll be making over the winter ready for next year, but right now, it’s a big let down to what is otherwise a really nice pack.

The guilty strap

The guilty strap

It’s very easy when writing a review of a Lightweight piece of kit to suggest that if you add this, and add that you could improve it, do that enough and your lightweight pack is not so light any more. But I do have to wonder how much extra weight it would add to stick a couple of lash loops on the bottom of the pack. Or move the triglide on the strap down a bit so that it actually works with the female anatomy…

On the whole this is a nice pack, it’s light, and carries the load well. I don’t regret buying it. It’s a good pack, but a couple of tiny niggles stand in the way of it being a great pack. Maybe Osprey will one day make a version 2, that fixes these bugs.