A Brompton’s winter boots.

Winter seems to be well on it’s way, the hard frosts are predicted, and the gritters are heading out onto the roads in a bid to keep them ice free.

Just the thought of falling over on an icy bend is enough to drive most cyclists towards taking the bus to work until conditions improve. But it doesn’t have to be the case. For years Schwalbe (and others, notably Nokian), have produced studded winter tyres in various sizes that allow you to keep cycling throughout the winter months. But there has always been a gap in their range at the smaller size bracket. After all, what sort of crazy idiot would want to put studded tyres on a bike with 16″ wheels. Hello.

For the first 7 years of Brompton ownership, when ever I spoke to someone at Brompton, be it a designer, sales rep, or even the CEO (via twitter), I would mention that it would be great if there were studded tyres for the Brompton. Finally after all that nagging, Schwalbe announced a couple of years ago they would make 30×349 (that’s 16″ x 1.2″ in old money) studded tyres that would fit the Brompton. WOO!

November 2015 with a need to get to college what ever the weather, I bit the bullet and invested in a pair of Schwalbe Winter tyres.

Spiked tyre

Fitting these tyres to the Brompton is not the easiest task, they come somewhere between a Marathon and a Marathon Plus in terms of difficulty, but nothing that a bead jack doesn’t solve. You just have to be aware that they fight back more than non studded tyres and fitting them can require a blood sacrifice…

The main gotcha to be aware of is that because of the way the Brompton folds, the studs will chip the paintwork on the frame when the bike is folded. Wanting to protect the paintwork as much as possible, I fashioned a couple of leather guards that I laced onto the frame. They are 2.6mm leather held on with bungee cord.

Leather frame protectors.
Leather frame protectors

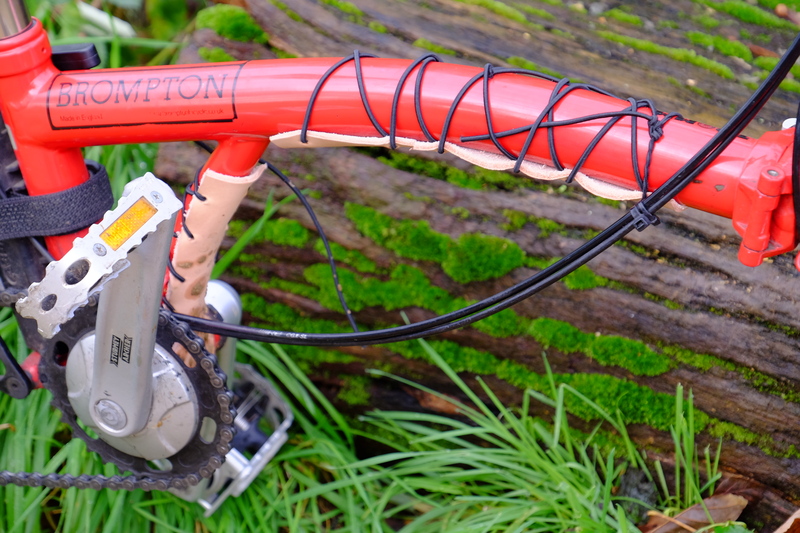
They win no awards for their beauty, they were a proof of concept that I made from scraps of leather I had laying around. Now I’ve proved the concept works, I’m pondering a mark 2 version that looks a bit better.

Once you’ve got the tyres fitted along with the optional frame protection, you need to run the tyres in on normal roads before you set off on the ice. The recommendation from Schwalbe is 40km without heavy braking or acceleration. You only need to do this the first time you fit them, in future years they should be good to go on the ice straight away.

The tyres have two recommended operating pressures, ~7 bar for roads that are mostly clear or fully clear of ice, and if you are expecting lots of ice, deflate them down to ~4.5bar. This lead to an interesting question about what pressure you should run them in at. I opted for 4.5bar. I’m not sure what pressure Schwalbe recommend. (note you can pump these right upto 8bar, but at that point the ride becomes rather painful)

Running them for the first time what becomes immediately apparent is the noise. Ye gods these things are noisy. On normal tarmac they make a hell of a racket. This can be a good thing, pedestrians certainly hear you coming. I tend to listen to music or podcasts when cycling which certainly helps cover the clatter.

Once you get used to the clatter, and the slight increase in rolling resistance compared to say Marathons, then they feel just like any normal tyre.

The tyres feel grippy in all the conditions that I’ve used them in. (Un)fortunately fitting studded tyres to a bike seems to act to ward off the snow/ice, and winter 2015/2016 was pretty mild so I didn’t get to test these to their fullest, I’m kinda hoping that 2016 brings proper snow and ice so I can get some sub zero miles in.

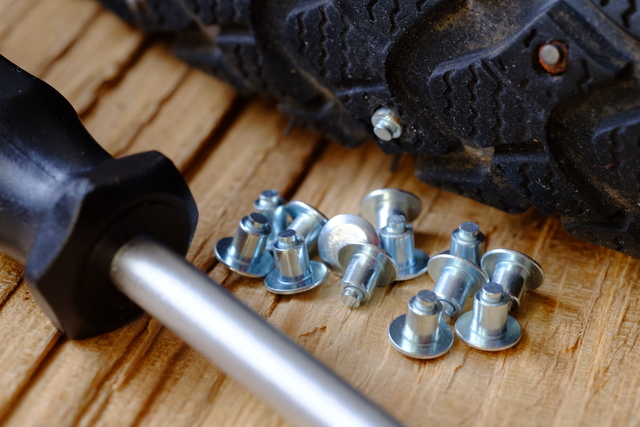
Over time the studs can and do fall out, over something like 600+km I lost 3 studs (2 from 1 tyre, 1 from the other). Schwalbe have anticipated this and produce a pack of 50 studs and the tool necessary to fit them. I got this for just over a tenner on amazon. They also sell a pack of 50 studs without the tool.

Tool, Studs and tyre. The shiny stud has just been installed, the other one has seen a season's use.
Tool, Studs and tyre. The shiny stud has just been installed, the other one has seen a season’s use.

In terms of puncture protection, the tyres come with Schwalbe’s “K-guard”. This provides some protection, but nowhere near as good as on Marathon or Marathon Plus. I had 2 punctures over the winter, both in the same tyre (rear). Fixing a puncture when it’s 0°C is a bit of an interesting experience, balancing dexterity with keeping your hands warm, so this is something to bear in mind. (For larger bikes, the Marathon Winter has better puncture protection and more spikes, but only goes down to 42×406).

All in all with affordable Spiked tyres and appropriate clothing, there’s very little excuse not to keep riding through the winter, even on a Brompton.

Post script: When cycling across ice it’s easy to forget that it’s slippery, and the moment you stop and put your foot down, you fall over. The solution to this is studs for your shoes. I have a pair of Kahtoola nanospikes for slippery pavements which work well for this.

KIT: What’s in the backpack?

I’ve had a number of people asking me if I really fit everything for a weekend hike in my 30L pack. So I thought I’d right a post with a details what’s in the pack for a typical summer weekend hike. The photo was taken at the end of a trip so there’s no food in the pack.

Pack contents

Pack contents

  • A – Sea-to-Summit Outhouse & Coughlans trowel
  • B – Clothing – a few pairs of underwear, spare socks, spare baselayer (Rab MeCo 120 SS)
  • C – RAB Siltarp 1 + 6 x Alpkit Y beam pegs in Treadlightly bag
  • D – Evernew 1.5L water pouch
  • E – Mountain Equipment Lamina 35 sleeping bag
  • F – Osprey Tempest 30 Backpack
  • G – Exped Synmat 7 UL, Schnozzel pump bag, Exped Pillow UL, RAB silk sleeping bag liner, Mossie headnet
  • H – Alpkit Hunka XL bivvi bag.
  • I – Sawyer Mini, 2L bag, gravity conversion kit.
  • J – Powertraveller powermonkey Extreme + cable
  • K – Evernew Appalachian set + Evernew 400ml mug
  • L – Paramo Bentu fleece
  • M – Svord Peasant Mini + EDC Fire Kit (both in right pocket)
  • N – Meths
  • O – Paramo Fuera Ascent Jacket
  • P – Brewkit.

Not labelled is the silver foil coated bubble wrap insulation that I use as a ground pad under the Exped Synmat.

Brewkit contents

Brewkit contents

In the brew kit I have teabags, hot chocolate, soup, knife, fork, spoon, salt, pepper, oil, pot gripper, and the BPL universal trivet. The tub doesn’t weigh much more than a similar size stuff sack, and protects the contents.

When packing I try to make sure everything goes into the pack in the reverse order that I need it, so the sleeping bag goes in the bottom, then the bivvi bag, then sleep mat, then tarp etc…

The powermonkey pack goes in the zip pocket on the underside of the lid, the sawyer goes in the stash pocket on the front of the pack, the trowel and fuel in a side pocket, and the water pouch in the other side pocket.

Contents of the pack pockets

Contents of the pack pockets

In the hip pockets I have a few odds and sods, the first aid kit (large dressing, pouch of plasters, tube of pills) goes in the left pocket, the right pocket has sunblock, insect repellent, small saw, and the Zelph Starlyte stove. I keep my inReach Explorer on my left shoulder strap, and my Petzl Zipka 2+ on the right strap, so I don’t have to rummage about in a pack to try and find it in the dark.

With everything in the pack there is room for food on the top, and in the stash pocket. The lid pocket is also empty and I usually fill it with food. Dry weight, it’s 6.6kg.

Packed and ready to go

Packed and ready to go

Everything I need for a few nights hiking, all carried in a 30L pack, with room for food.

KIT: Stayling Alive Cold Kit

Inspired by Susanne’s Williams thread on making a Staying alive cold kit, I decided to make one of my own. Not wanting to faff about cutting up space blankets, I decided to throw a tiny amount of cash at the problem.

Adventure Medical Kits make a couple of useful items that make a SAC kit really simple. My kit is made up of:

  • AMK Survive Outdoors Longer Survival Poncho
  • AMK SOL Emergency Blanket
  • Storm matches
  • 3 x tea lights
  • NATO Aviators fire kit
  • Alpkit dry bag to store it all.

Staying alive cold kit contents.

I won’t duplicate the content of Suzanne’s thread on how to use a SAC kit, but for those who haven’t read it, the basic idea is something that fits in a pocket when out in winter, whilst providing enough basic shelter and warmth to survive the night. The whole lot was largely used to hit the free postage threshold on amazon.com, and comes in under 20 quid. The only downside, is that the poncho + blanket seem to be of the kind that once unfolded, you will never get them as small and well folded up ever again…

Postscript:

Since I put this kit together I’ve had to use parts of it in anger once. Cycling to the station after college I got too hot, perspired too much, and soaked my base layer. Sitting at the station for 35 minutes in -3°C, I started to chill, so resorted to using the space blanket from my SAC kit to keep myself warm until the train arrived.

Kit: Everyday fire

I’ve mentioned in a couple of recent posts lighting fires with the stuff I have in my pockets, on one occasion because I hadn’t planned on a fire, and another because I wanted to double check that I could. With this in mind I thought I’d write a short post on what I carry with me so I can produce fire when needed.

EDC Fire kit

EDC Fire kit

The first item I carry with me started life as an Every Day Carry Fire Kit by Polymath Products. The first version of the EDC fire kit came with a little thermometer on the top, I didn’t expect this to be all that useful to me, so I did a special order with a compass instead. In this respect externally it closer resembles their Ultra Compact Survival Kit.

Inside the EDC Fire kit, showing Ferro rod, and Tinder quik tinder.

Inside the EDC Fire kit, showing Ferro rod, and Tinder quik tinder.

Inside the shotgun shell container, there is a ferrocerium rod (aka ferro rod, fire steel etc…), and some tinder. The kit also came with waxed Jute tinder, some pyro powder, and a glow stick. I took these out and replaced them with Tinderquik fire tabs. These are piece of compressed cotton that is treated to make it very flammable, you fluff the end up and they take a spark really easily. I fit 8 of them in the EDC fire kit.

To use the kit you remove the split ring from the hole on the ferro rod, insert the ferro rod into the hole in the shell (the shell then becomes the handle), fluff up a bit of tinder quik, and strike a spark. I really like this kit, the compass has proven very useful even in the urban environment, particularly to orientate myself when exiting tube stations. I’ve even used it to light a BBQ at a friends place.

Contents of the Spark-Lite™ kit

Contents of the Spark-Lite™ kit

Whilst the EDC fire kit lives in my pocket, I also carry in my backpack something called the Spark-Lite™ emergency fire starter. This is a small green box containing 8 tinder quik fire tabs (spotting a theme here?) and a sparker. There exist 2 basic models of the Spark-Lite™, one has a metal sparker and one a plastic. Of each of these there is a Green and an Orange version. I own both the plastic and the metal version. It’s the metal one that lives in my pack. Aside from the material, the main functional difference between the metal and plastic versions is that the metal version comes with an allen key and a spare piece of ferro rod. The allen key undoes the nut that holds the piece of ferro rod in place.

To use the Spark-Lite™ kit you fluff up one end of the tinder-quik, then using the sparker just like you would a cigarette lighter, strike a spark onto the tinder. The first time I used this the tinder-quik lit off the first spark, which took me by surprised and I dropped it. It’s a really effective tool. As with most kit I use, I have modified it. I suspect that the metal will not be nice to touch in very cold conditions, so have put a piece of heatshrink on the handle to protect my hands. I’m really pleased with how well this set works, and considering that it cost me less than a fiver on ebay, it’s hard to go wrong.

EDC Fire kit and Spark-Lite™ Emergency Fire Starter.

EDC Fire kit and Spark-Lite™ Emergency Fire Starter.

KIT: Firecord

I saw Firecord on The Bushcraft Store website and was kinda curious about how good it was. I was ordering from them anyway, so ordered a 25ft hank of it thinking that it might be worth making some zip pulls and the like, so I could carry tinder, and cord, and have an actual useful item.

Normally I’m not one for paracord, I find it too heavy, and too stretchy for most of my uses. My tarps use 2mm Dyneema (more on that in another post at a later date), or 1.12mm micro-paracord on my siltarp 1. But the idea that this had multiple uses piqued my interest.

The stuff arrived in a hank of 25′ (that’s 7.625m in real money). It certainly felt like the genuine quality paracord, unlike a lot of the cheap stuff that is sold as paracord. You can tie knots in it, and play with Macramé1, as you would expect. But that’s not the important bit, that’s not why you buy Firecord.

Paracord is a nylon outer with 7 inner braids, that together gives you a rated strength of 550lb2. Firecord however is slightly different, it has an 8th core. It’s this 8th core that marks Firecord out.

Innards of Firecord.

The innards of firecord

Lop off a short length of Firecord, pull it apart, and you have at your disposal a useful piece of tinder.

While you can light the tinder from inside Firecord with a lighter, to get best performance, you want to attack it with a knife and fluff it up a bit.

Fluffing up the tinder braid of Firecord

Fluffing up the tinder braid of Firecord

Once you’ve fluffed it up with a knife, the Firecord takes a spark with relative ease.

Lighting Firecord with a ferro rod.

Lighting Firecord with a ferro rod.

Lit Firecord

Lit Firecord

Well it works. Now to make it more useful. It’s too heavy to replace all my tarp guys with, also a bit too expensive and gratuitous for that… No needs something smaller… Zip pulls. A Firecord zip pull for my PFD3. Now you can buy ready made Firecord zip pulls, but they don’t really give you much by way of actual cord, and they are rather expensive… There has to be a better way.

Enter the Square Sinnet Knot 4. Using 2 x 600mm lengths of Firecord & a split ring, I put together a chunky Zipper pull, to put on my PFD. Giving me some useful cordage, and some useful tinder if I happen to fall out, and lose my boat. All in a 10.3g package.

Firecord Zipper pull + Leatherman Juice CS4 for scale.

Firecord Zipper Pull – Leatherman Juice CS4 for scale

I posted about this on the BCUK Forum, and one of the questions I got back was how well does it work once it’s wet. Well in theory it works well… But lets try it just to be sure…

Firecord in water.

Soaking the Firecord…

I took the trimmed ends from my Zipper pull, and soaked them in water. Content they were nicely wet, I pulled one out and gutted it.

Gutted soaked Firecord

So now all I have to do is fluff the cord up a bit, and attack it with a ferro rod.

Lighting wet Firecord

Lighting the wet Firecord

It took more effort to light than the unsoaked cord. Tho using a bigger piece might have been easier. But after a few showers of sparks, it lit. It burned just as well as the non soaked bit.

Lit firecord

Lit firecord.

I think it’s fair to say it works. I’m now looking at the rest of my kit and wondering where I could make use of cord with integral tinder…

  1. The fancy name for the stuff people do with paracord when making bracelets and the like
  2. Which is where the name 550 cord comes from
  3. Personal Flotation Device aka life jacket aka buoyancy aid
  4. Ashley Book of Knots # 2912 and # 2915

KIT: The big three

This post is another in response to a question I’ve had: (Slightly Paraphrased)

“Do you really fit a weekends worth of wild camping gear in 5kg?”

The answer is Yes, I do. But before I go into details of what makes up the bulk of the 5kg, I should qualify things. Firstly, that 5kg is dry weight, so that doesn’t include water, food, or fuel. Secondly, that is the summer bag. In winter I use a heavier sleeping bag and a heavier bivvi bag, making my dry pack weight nearer 6.5kg.

The big three is a term coined by Ray Jardine. They make up the bulk of the weight of your pack. So what are they?

  • Backpack
  • Sleep system
  • Shelter

In non ultra light hiking it’s easy to pile on the pounds with these three items. Before I started aggressively lightening my pack the big three were:

  • Backpack – Berghaus Vulcan + PLCE Side pockets – 3.2kg 110L
  • Sleep system – Snugpak SF 2 sleeping bag + Highlander self inflating sleep matt – 3kg
  • Shelter – Vaude Hogan – 2.9kg

You can see that these three items alone are over 9kg. Having 110L of backpack then encourages you to take more stuff, after all you’ve got the space in your pack… This resulted in my lugging 25-30kg backpacks round Europe on various trips before I decided that there had to be an easier way of doing it.

So what are my current big three?

  • Backpack – Osprey Tempest 30 – 0.85kg
  • Sleep System – Mountain Equipment Lamina 35 sleeping bag (1.02kg), Exped Synmat 7UL (439g) – 1.459kg
  • Shelter – AMK SOL Escape Bivvi (240g), Miltec Flecktarn plane tarp(543g inc pegs + guys) – 0.783kg

Those of you good at mental arithmetic will be able to quickly sum that the total for the big three is 3.092kg. Giving me around 2kg for all the other bits an pieces.

I mentioned before that this is my summer bag. What changes in winter?

  • Sleep system – Mountain Hardware Laminina 20 – 1.55kg
  • Shelter – British Army XL Goretex bivvi bag ~0.9kg

This adds 1.3kg on to the weight of the summer bag. The only reason I change bivvi bag is because the AMK SOL Escape bivvi bag is a bit tight on the hips, causing compression of the loft, resulting in cold spots. I am thinking of getting an Alpkit Hunka XL for next winter, saving me about 400g.

So you can see, a simple yet light big three, with the best part being that the most expensive single item was the sleeping bag (£93 for the Laminina 20, and £85 for the Lamina 35). Going ultra light doesn’t need to be that expensive.

KIT: Taking shelter – Tarps.

I’ve had a question asking me what tarp I use when I’m wild camping with a bivvi bag.

I own three tarps. Which one I take with me for any given trip depends on where I am going.

The first tarp I got is a British Army Basha. It’s 2.5m x 2.2m, made from Silnylon, and weighs in at nearly 1kg with guy lines. It’s a lovely tarp that covers a nice big area, but it is very heavy. If I am car camping and don’t want a tent, then this is the tarp I use.

British Army Basha in the woods – June ’14.

The second tarp I got is a Miltec Flecktarn Plane Tarp. This tarp is 2.6m x 1.7m, weighs in at 450g, and is made from PU coated nylon. This is the tarp I take when wild camping in lowland situations where perhaps wild camping isn’t entirely encouraged. The flecktarn camo pattern blends well with many of the areas I camp in, particularly in winter. This tarp isn’t as big as the Army Basha, but it’s half the weight, and provides enough cover for me in a bivvi bag.

Miltec Flecktarn tarp in the woods – May ’15

The 3rd tarp I own is a RAB Siltarp 1, this tarp is 2.2m x 1.5m, weighs in a 198g without stuff sack, and is made of Silnylon. It’s a beautiful light tarp that I got to use with a bivvi bag when wild camping in locations where stealth isn’t my primary concern. In some respects the lightness of this tarp has given me headaches with other aspects of the tarp setup. Add eight 12g pegs, and you’ve increased the weight by 50%… I use 1.12mm microparacord for the guys on this tarp, it’s under half the weight of the 2mm dyneema I normally use for my other tarps. The total weight of the guys on this tarp is 28.6g. I’m still searching for the best pegs.

If you ask on a bushcraft forum for a tarp recommendation, the DD 3m x 3m tarp will come highly recommended. I decided against it as being too heavy, and also too big. Camping in woodlands, finding space for 9m² of tarp is not always easy. If I was in the market for a new tarp to use when bivving aside from the tarps I own, the other that I would consider near the top of the list is the Alpkit Rig 3.5.

On all my tarps I use glow in the dark line loks on the guy lines. They provide just enough visibility at night to see where I put my guys. I currently have some spares up on ebay if anyone is interested.

Hopefully this post has gone somewhere to answer the question about which tarps I use, and what tarps I would recommend.